I might not have been blogging much but I have been busy over the last few weeks. These are 2 dolls I dressed for the latest minidoll project, Camelot's Court.
Darius and his granddaughter, Nell. Darius is a medicine maker and healer and he is teaching Nell all the secrets of his trade.
I researched the costumes by watching lots of Merlin episodes(BBC TV series) - at least that was my excuse.
The dolls are porcelain from various sources and are 1/12th scale.
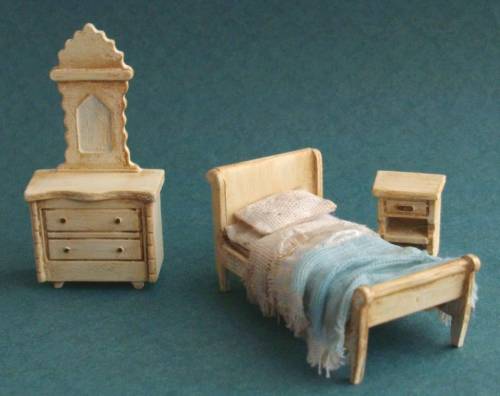
Here are a couple of the 1/48th scale beds I painted and dressed, or should that be distressed. The dressing table does now have a mirror, I just couldn't wait to take the pictures.
I will be putting the top bed in my haunted house. Yes, there's another project not quite finished.
I do have a few more things to show from my 6 weeks lack of blogging but I will save them for other posts.
For those who have never come across BPF, it stands for Brown Plastic Furniture and comes in packets like the one pictured below.
With a little time on my hands, while waiting for paint to dry on the shop box, I painted some of the 1/48th scale furniture that I had already sprayed with primer.
There was a few mould lines to cut of and sand before painting but the reast of the transformation has just been a quick brush or two with paint. I will add some clock faces to the clocks when I find my printies.
I have have some bedroom sets done in the same way. They are just waiting for some bed covers before I take pictures.
I have done a little more on the shop box. Finished all the brick work, painted outside and almost finished painting inside.
I have used a different door to that which came with the kit as this did not have a window. I used a cheap wooden Georgian door and removed the top 4 panels by simply cutting through with a craft knife. Then used some thin strips of wood for a frame and some plastic off some packaging for the window.
The floor tiles are terracota paper clay with an antique wash. This my first attempt at floor tiles using this method and it was a little tricky as I was going to use plastic tiles so I'd already put the walls together. None the less I was happy with the result.
The walls are painted a lovely Victorian green which I can't get to show up too well on the pictures so you will have to take my word.
This picture show the inside of the front wall..
Here's a close up of the brick work. I love the result of this brick method. Looks very realistic but then it is called "Realistic brick compond".
Below is a video from the makers of this product, showing the process of stencilling the bricks.
I want to just add one thing to the video. They say you can add the stencil back on before the first lot of bricks is dry, but I found I was squashing some of the wet bricks, so I quickly dried the overlapping area a llittle with a hair dryer.
What a bad blogger I am, I can't believe it is a month since I last posted here. I have been really busy but I don't seem to have too much to show for it. Now the kids are on holiday and between keeping them happy and sorting out orders there's not much time left.
I have only done a little more on the caravan so I will save the update until I have more to show. I have also been working on a couple of shop boxes which I will be adding to my online shop, hopefully in time for Christmas sales.
This shop box I have had in a box on a shelf for quite a few years an it is really good to finally see it getting some attention. It is 1/24th scale and I will be selling it empty so I want to keep the shop type option fairly open so the buyer can decide the type of shop but I am trying to aim for a Victorian look.
After an undercoat of white paint and a base paint of a mortar colour, I used brick stencils from Bromley crafts to add brick work to the front and 2 sides. I used masking tape to mask off the areas where the door and window frames would go and the moulding above the front.
I have now added windows and done some painting so will get some fresh pictures today and post another update asap, hopefully before another month has passed.
I've added a for sale page for all the odd handmade pieces I have that are 1/12th scale (the wrong scale for my shop). The first item is a sewing box/table and was made by a friend.
The link is at the top of the page and all the info you need should be listed with more pictures.
This is the ledge caravan as it stands today. It has it's background coat of paint and I will be adding some tiny painted decoration to the outside. I have attatched the carriage lamps and they are working lights, with the wiring passing invisiably through a hole at the back to the inside. No door at the moment - well it did have a door but I took it off because it opened the wrong way.
The oil lamp inside is also a working light. The wires passing around the back of the mahogany cupboards, out onto the seat area and through a hole in the corner or the side of the bed. The back of the seat was intended as the seat, but as I wanted an upholstered seat, I am using it as the back. The wire on the seats will be covered up with upholstery.
The opposite side showing the stove which needs some bling.
The under bed area provides a perfect space for the wiring and battery. I have also cut out a hole for a tiny switch - I didn't want to be taking the roof off and the bed out to put the lights on.
Next job is to solder the wires to the switch and the battery clip.
My house (that's my real house) is awash with UFOs. No, not the sort that may contain little green men, but the "UnFinshed Objects" of the miniature sort. One of these UFOs is a 1/24th scale Gypsy Caravan or a Ledge Wagon made from a kit from McQueenie Miniatures - they are not cheap but they are well made and have good, clear instructions and I have them on my web site if you're interested.
The idea was to quickly make it up and paint it to give my customers a picture of a finished wagon. But, being me, it was never going to be so simple.
I started to put it together as the instructions and while waiting for glue to dry I researched colours and interiors ready for painting. That's when I saw the panelling on the exterior of the caravans - "that would be so easy to add to my wagon". So out came my tiny strips of wood and my chopper and I chopped and stuck and chopped and stuck.....it wasn't too difficult, but very time consuming. The result was so worth it.
The caravan is never going to be an exact replica but I hope by spending a little more time and a little research, it will give more of a feeling of the Romani life than if I'd just slapped a coat of paint on it.
I have done quite abit more since this last photo and tomorrow I will try and add some more recent pictures.
Here are just a few of the little 1/24th scale doll's dolls I have recently added to my web site. Of course they would also work as smaller dolls in 1/12th or 1/16th scale. These are the same ones I posted undressed, a few weeks ago. They are made from polymer clay and dressed with fabric, lace and trims.
I only made a couple of little clowns as I wasn't sure these would sell as well as the cute dollies, but, low and behold, I sold one straight away. I will definately make more.
They are shown sat on a 1/24th scale chair which gives you an idea of the size in scale.
If you want to see them all, you will need to look on my shop web site - A Trifle Small
Do you remember the 1/48th scale dolls I made along with the "MuffinDolls"? Well I finished dressing them a few days ago and thought I should add a picture.
Grandpa and Grandma. They would be a little under 1.5" if they were standing.
I will be definately making more next time I have the clay out and will be adding some to add to my web shop.
And finally my third doll for the Astoria project.
The Gothic bride, Morgana.
She is holding a bunch of black roses and I also made a bunch of red roses. Both sets of roses were made from thick tissue paper. The black tissue came with a pair of shoes and the red off a party hat. I'm not sure about the black, not tested it yet, but the red isn't fade resistant, but then what Goth girl likes bright lights or the sun?
Her hair and that of Embers was made from dismantled hair bands. I will try and get some pictures of the sort I mean and how I got hair from them.
Here's Chandra, my Astoria Black Dress doll (see previous posts).
Chandra means "The Moon". Which I thought was an opt name for this doll with her dress as black as the night sky and her face pale and shinning the the moon.
I finally managed to take some full length photos in which you can see the dress detail and face.
She is a 1/12th scale porcelain doll, (with some shapely fimo bits added).
I knew it was going to be tricky taking pictures of the black dresses but convinced myself I could do it. After a full hour taking pictures and trying to edit them, I'm not so sure.
I have taken some full length shots and the dresses show up quite well, but the faces came out to bright. Get the faces right and the dresses are to dark to see all the detail. I'm not so easily defeated so I'm going to give it another go to see if I can get some better shots.
Here are some close up head shots of my three ladys, which came out fine.
Remember to click on the pictures to get a biger view.
I added polymer clay to build up a figure for a tight fitting dress. I used one of Dana's patterns, altered slightly and some old blouse fabric reversed for the dress (too shiney on the right side). It was very difficult trying to get a tight fitting dress without glue showing. I finally finished off the side seams with a piece of very narrow ribbon to hide the last bit of glue that I couldn't remove.
Still trying to think what to do with her hair. I want to keep the goth look but do something different from the other two.
Now where are the finished doll pictures? I hear you asking. As soon as I finish up the last of the trio, I will take some pictures.
I finished my bride and now on to the second doll for the minidolllist Grand Astoria Hotel Project ( http://www.minidolllist.com/ ).
This is my fantasy doll, again I'm doing a Gothic style - this one will be modern meets Georgian, well sort of! She just has a few finishing touches and then I can take some pics.
This is my first Astoria doll for the for the minidolllist Grand Astoria Hotel Project ( http://www.minidolllist.com/ ).
I need to create a bride/wedding doll, a fantasy doll and a "Little Black Dress" doll. I also decided to add the additional theme of GOTHIC to my series of dolls (no surprise there).
This doll is being turned in the wedding doll. I have almost finished her, just need to drape her dress and make a bouquet of flowers. Of course she isnt dressed in white.
I was thinking of calling them "Muffin Dolls" due to their muffin shaped heads but will have to check I'm not copyrighting any names there. I will start dressing them once I have finished the 3 Astoria Dolls.
Also in the picture are a pair of 1/48th scale dolls with the same muffin style head. If they look OK when they are dressed, I will make some more.


.JPG)
.JPG)
.JPG)
.JPG)


 The under bed area provides a perfect space for the wiring and battery. I have also cut out a hole for a tiny switch - I didn't want to be taking the roof off and the bed out to put the lights on.
 The idea was to quickly make it up and paint it to give my customers a picture of a finished wagon. But, being me, it was never going to be so simple.
 I started to put it together as the instructions and while waiting for glue to dry I researched colours and interiors ready for painting. That's when I saw the panelling on the exterior of the caravans - "that would be so easy to add to my wagon". So out came my tiny strips of wood and my chopper and I chopped and stuck and chopped and stuck.....it wasn't too difficult, but very time consuming. The result was so worth it.
 The caravan is never going to be an exact replica but I hope by spending a little more time and a little research, it will give more of a feeling of the Romani life than if I'd just slapped a coat of paint on it.


